Sunday, May 29, 2011

Buddies!

Aren't they cute? They weren't always such good buddies!

When we first brought Addison home from the hospital, our dog Trip wasn't so sure what to think of her. In fact, he was downright terrified of her! It was the first time he'd really seen a "mini" human.
He was so scared, he wouldn't move off his bed. He wanted to be as far away from her as possible! 
 Eventually, his curiosity got the best of him and he decided to check her out. Once he decided she wasn't so scary, he fell in love with her!
 Now they are buddies for life!
 
And you hardly ever see the two of them apart! 
 Wherever Addison is, you are almost sure to find Trip!


P.S. I just had to show you this picture of Addison conked out in her jumper! It was too cute not to share! :) 

Enjoy your long weekend!


Photobucket

Thursday, May 26, 2011

My New Kitchen Containers (And a Very Jane Shout Out)

My kitchen needs a real updating and so far it has been a work in progress. One thing I've been wanting to do for awhile now is update my kitchen containers.

We've had the same containers since we were married and they were containers my husband had when he was a bachelor. Yeah. Not cool.
They actually weren't horrible but I am not a huge fan of stainless steel (I know, GASP) so I promised them to my brother. He happens to like stainless steel and he's still a bachelor! :)

So this time around I wanted to go for a more sophisticated looking container. That's when I discovered these simple, yet fabulous glass containers at Hobby Lobby. As soon as they went 50% off, we stopped by to pick them up!
I liked them and all but I felt that they could use a little sprucing up. Then I saw these amazing labels on Very Jane one day! If you want to hear more about Very Jane, scroll down to the bottom of this post! 


As soon as I saw them, I knew they were perfect! The best part of it was that they were super cheap! :)
Here is what they looked like straight out of the mailing envelope! So fun! Of course I couldn't wait to put them on so I went right to work. 

Here are the steps that I took in order to apply them.
1. First I cleaned the area where they vinyl was going to be. This would be easier to do BEFORE you fill the jar but mine was already filled so I had to make it work! :)
2. I then peeled off the backing and centered the vinyl where I wanted it.
3. Using a scraper from Pampered Chef, I made sure there were no air bubbles under the vinyl.
4. Then I peeled off the clear plastic.
5. Ta da! Now I have some cute labeled jars!
6. Don't they look much more sophisticated? Even this little touch has done wonders for my kitchen already. It's quite amazing what something so simple can achieve! :)

I am hoping to get more so that I can use the rest of my fun labels! Obviously I won't keep all the jars on my counter but they will definitely make my cupboard look much more organized!

Now do you want to know more about Very Jane? If you already know about it, feel free to stop reading here. However, if this website is new to you, you will want to know more. TRUST ME.
 
Very Jane is an online store that has a different featured discounted boutique item listed every single day. Sometimes the savings are up to 80%! I have been extremely impressed with the quality of items that have been listed too! So far I have purchased (including the free items that they had their opening week) 4 different items and they've only been around for a couple of months!

Here's what I've purchased so far!
 This adorable spring printout was absolutely free!
 
As were these adorable cabochon hairpins (which I completely love)!
 
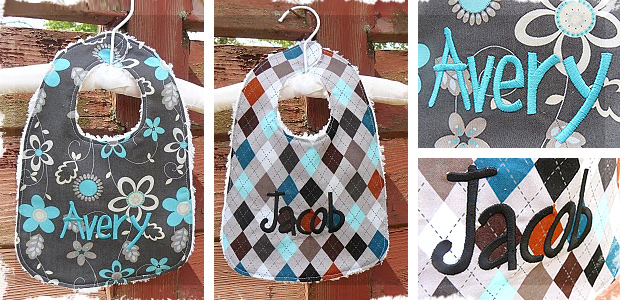
 And just today I bought this fun bib which will have Addison's name embroidered on it! How cute is that?

Honestly, one of the first things I do when I wake up is to check and see what is listed on Very Jane! That is how impressed I have been with the items listed and their prices! The best part about it is everything that is listed is homemade! I love to support small businesses, especially those who create everything by hand! :)

So if you haven't already, stop by Very Jane! I will warn you though, it's a very addictive site and your husbands may hate me for sharing it with you! :)

P.S. I am in no way affiliated with Very Jane, I am just a very satisfied customer!


Photobucket

Wednesday, May 25, 2011

My Drab to Fab Tray!

I was at our local thrift store the other day when I came across this really boring wooden tray. It was only $1 so I knew I could make some use of it somehow! There was definitely some potential there! :) Of course I forgot to take a before picture but I wanted to share the end results with you!

First I primed and painted the tray white. I just used Anita's All Purpose Acrylic Craft Paint to do this. Easy peasy! :)

To add a little extra touch I painted the word faith on the tray using a crackle technique. To do this I used this "Faith" stencil that I picked up at Hobby Lobby.
To start, you will need to tape down the stencil so it doesn't move. I just used regular scotch tape and taped all four sides.
In order to get the crackle look, you will need to use a crackle medium. You could also use glue but that will have to be a tutorial for another day! :) The crackle medium that I choose to use is FolkArt Crackle Medium. I find that this medium works great!
To apply the crackle medium you will need a sponge brush of some sort. You want to make sure that you don't go over the same area more than once because the crackle won't look quite right. I used a sponge dauber to pounce the medium onto the stencil but you could use any type of sponge brush. After you have covered your entire area, let the medium completely before moving on to the next step.
After your medium is dry, you are ready to apply the top coat of paint. For my tray I used FolkArt Acrylic Paint in the color Basil Green.
Again, you can use any type of foam brush but I choose to use a sponge dauber so that I could easily pounce on the paint. I found that this technique is the easiest because it doesn't cause the stencil to move around so the paint can't get underneath it. As with the medium, do not go over an area more than once or the crackle will not look good.
Let the paint dry, and VOILA! 
I love the finished product but I am trying to decide if I should give it a more distressed look by sanding down the edges. What do you think? Do you like the clean look or should it have more of an aged feel?
Now it sits in the middle of my coffee table. If I have a magazine that I am currently reading, it sits in my tray.
But for the most part, my tray sits there empty so that I can see the word "Faith". 

My faith in God means a lot to me so I wanted to be able to show that. Of course a tray can't show my faith for me but it can definitely serve as a reminder!

Thanks so much for stopping by today! If you have any questions or comments, please feel free to share them with me!


Photobucket

Monday, May 23, 2011

AH.MAZE.ING Deal!


Are these button pony tailers not the cutest things ever? Well guess what. The sweet and hilarious Tina from Sweet Floweret is GIVING THEM AWAY! Right now, the first 50 people who follow three simple steps will receive these in the mail for FREE! Seriously. Who would not want these? I know I do! Hurry though because she currently only has about 20 spots available and I expect they will fill up very quickly!

Photobucket